


The Complete Guide to Getting a House Extension in Nuneaton (2026)
Your Roadmap to a Successful Extension
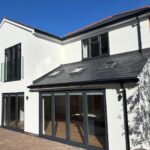
Thinking about adding a house extension to your Nuneaton home? It’s one of the best decisions you can make. But the process can feel overwhelming if you’ve never done it before. Where do you start? What are the stages? How much will it cost? How long will it take?
In this comprehensive guide, we’ll walk you through the entire journey from first idea to handing over the keys. Whether you’re planning a simple single-storey rear extension or a complex double-storey wraparound, this guide covers everything you need to know.
Stage 1: The Initial Brief – What Do You Want?
Before you ring a builder, get clear on what you’re trying to achieve.
Define Your Goals
Ask yourself:
– What’s the main purpose? Kitchen extension? Playroom? Extra bedroom? Home office?
– How much space? 20 square metres? 50? More?
– Single or double-storey? Upstairs as well as down?
– Garden impact? Can you lose garden space, or do you need to preserve it?
– Budget ballpark? Is this a £50k project or £150k+?
– Timeline? Do you need it done by a specific date?
Spend time on this. Clarity here saves time and money later. Talk to family, sketch rough ideas, look at extensions in your area.
Research Locations
Visit neighbouring properties with extensions. Chat with the owners if you can—they’ll often share costs and experiences. Look at what works visually. An extension that suits a Victorian terrace might look wrong on a 1950s semi.
Stage 2: Find a Builder and Architect
You’ll need two professionals (sometimes one person does both, but usually they’re separate).
Choosing a Builder
Your builder will:
– Advise on practicality
– Get planning permission and Building Regulations approved
– Manage the site, safety, and quality
– Liaise with architects, planners, and inspectors
Look for:
– Local experience: A builder who knows Nuneaton’s planning rules, ground conditions, and labour availability.
– Credentials: FMB membership, TrustMark registration, CSCS cards for all staff.
– Insurance: Public Liability (minimum £2M, ideally £5M+), Employers Liability if they have staff.
– References: Ask for 3–5 recent projects and contact the homeowners.
– Google reviews: Read what previous clients say (aim for 4.5+ stars).
Choosing an Architect or Designer
If you want custom drawings, hire an architect or architectural technician. They’ll create:
– Concept sketches
– Detailed construction drawings
– Elevations and sections
– Building Regulations compliance drawings
Some builders include basic design; others subcontract. Clarify this upfront.
Stage 3: Architectural Drawings and Design
Your architect will meet you multiple times to develop the design.
The Design Process
- Initial visit: They survey your property, measure walls and levels, understand your brief.
- Concept sketches: They present 2–3 options (rear, side, wraparound, etc.) with rough layouts.
- Your feedback: You choose which direction to pursue.
- Detailed drawings: They develop construction drawings, materials lists, and Building Regulations compliance notes.
- Sign-off: You approve the final drawings before they go to planners and regulators.
This typically takes 4–8 weeks.
What You Get
- Site plans (showing your property and the extension footprint)
- Floor plans (showing room layouts, doors, windows)
- Elevations (what the extension looks like from outside)
- Sections (cross-sections showing roof pitch, ceiling height)
- Details (close-ups of junctions, window reveals, etc.)
These drawings become the blueprint for planning, Building Regulations, and construction.
Stage 4: Planning Permission
Whether you need planning permission depends on your extension’s size and location.
Permitted Development
Most single-storey extensions in Nuneaton are Permitted Development, meaning no planning permission is required. The rules state:
- Single-storey extensions must be under 4 metres high
- Not more than 50% of original footprint (or 8 metres deep, whichever is less)
- Single-storey rear extensions must follow the 45-degree line (to avoid over-shadowing neighbours)
If your extension meets these criteria, you skip planning and go straight to Building Regulations.
When You Do Need Planning
- Double-storey extensions: Always need planning permission
- Large extensions: If over the size limits above
- Conservation areas: Almost always need planning permission (even single-storey)
- Listed buildings: Need planning permission and conservation officer approval
- Semi-detached flank walls: If extending a shared side boundary, planning may be required
The Planning Process
- Application: Your architect submits drawings, a planning statement, and supporting information.
- Validation: The council checks the application is complete (usually 5 working days).
- Consultation: Neighbours are notified; they have 21 days to comment.
- Officer appraisal: A planner assesses the application against local planning policy.
- Decision: Usually 8–13 weeks after submission. Approval, conditional approval, or refusal.
Tips:
– Engage neighbours early. A letter explaining your plans reduces objections.
– If comments are negative, your architect can revise the design (reducing height, setting back from boundary, etc.) and re-submit.
– Conditional approvals are common. Meet the conditions (materials samples, etc.) and you’re approved.
Stage 5: Building Regulations Approval
Building Regulations is separate from planning. It ensures your extension is safe, structurally sound, and energy-efficient.
Submission
Your architect submits Building Regulations drawings to the local authority (or to an approved inspector, like NAPIT). The submission includes:
- Structural design (roof loads, wall reinforcement, etc.)
- Thermal calculations (insulation values for walls, roof, windows)
- Drainage (where effluent goes, if applicable)
- Electrical design (where circuits and outlets will be)
- Fire safety (how fire spreads is controlled)
Approval Process
- Validation: The council checks completeness (usually 5 days).
- Technical appraisal: An inspector reviews structural, thermal, and safety aspects.
- Decision: Usually 20–25 working days. Approval or requests for clarification.
If there are issues, your architect revises and resubmits (usually free, once).
Building Control Inspections
Once work starts, Building Control inspects at key stages:
– Foundations: Before concrete is poured
– Structural frame: Before walls are covered
– Pre-completion: Before you move in (electrical, gas, drainage, overall finish)
These inspections ensure work meets regs. You can’t occupy the extension without a sign-off.
Stage 6: Finding and Hiring Your Builder
Once plans are approved, it’s time to hire the builder who’ll execute the work.
Get Quotes
Invite 3–5 builders to quote. Provide them with:
– Approved planning and Building Regulations drawings
– Your specification (materials, finishes, timescale)
– Access details
Ask for:
– Itemized quote (broken down by stage)
– Insurance details
– References
– Timeline and key milestones
Compare
Don’t just look at price. Compare:
– Timeline (is it realistic?)
– Experience (have they built similar extensions?)
– Communication (do you feel heard?)
– Payment terms (is it phased, or upfront?)
– Warranty (do they offer a NHBC Buildmark, or guarantee?)
Quantity Surveyor (QS) Cost Breakdown
Before committing, ask for a detailed QS breakdown showing:
– Labour (per stage)
– Materials (per category)
– Overheads
– Profit margin
This prevents scope creep and hidden costs later. Parker Grears provides this service for £240 + VAT—it’s worth every penny.
Stage 7: Payment Structure and Contract
Agree on payment before you start. Common structures:
| Stage | Payment |
|---|---|
| Exchange of contract | 10% |
| Foundations complete | 20% |
| Structure (walls and roof) | 20% |
| Watertight (windows and doors) | 20% |
| Internal fit-out | 20% |
| Final completion | 10% |
Some builders ask for more upfront; others allow 0% until work starts. Negotiate. A 50-50 split (half upfront, half on completion) is common for smaller jobs.
Contract Terms
Get it in writing. The contract should specify:
– Scope of work
– Payment schedule
– Timeline and milestones
– Exclusions (what’s not included)
– Insurance and guarantee terms
– What happens if the project delays or costs overrun
Stage 8: Site Preparation and Build Phases
Once the contract is signed, work begins. Here’s what to expect:
Phase 1: Site Preparation (1–2 weeks)
- Temporary site fencing and welfare facilities
- Setting out (marking the extension footprint)
- Existing structures demolished (if needed)
- Access routes for delivery vehicles
Phase 2: Foundations (2–3 weeks)
- Excavation and ground assessment
- Concrete trenches or pads (depending on ground type)
- Building Control inspection
- Concrete cured (typically 7 days before building on it)
Phase 3: Structural Frame (3–4 weeks)
- Brick or block walls built
- Roof structure (timber or steel) installed
- Building Control inspection (structural)
- Windows and external doors fitted
Phase 4: Watertight (1–2 weeks)
- Roof coverings (tiles, slates, or felt) installed
- Guttering and downpipes
- Internal membrane and damp-proof courses
- The extension is now weatherproof
Phase 5: Internal Fit-Out (4–6 weeks)
- Electrical first-fix (cables installed, before plasterboard)
- Plumbing first-fix (pipes installed)
- Plasterboard on walls and ceilings
- Gas work (if applicable)
Phase 6: Finishing Works (3–4 weeks)
- Electrical second-fix (sockets, switches, lights)
- Plumbing second-fix (radiators, taps, sanitary ware)
- Tiling, flooring, painting
- Decoration and final touches
Total Timeline
A typical single-storey extension takes 16–20 weeks from excavation to handover. Double-storey or complex designs take 20–28 weeks.
Stage 9: Inspections and Sign-Off
Throughout the build, Building Control inspects at key points (foundations, structure, pre-completion). Once all inspections pass and work is finished:
- Final snagging walkround: You and the builder identify any minor defects (paint touch-ups, adjustments, etc.). These are rectified.
- Building Control final sign-off: The inspector confirms everything meets Building Regulations. You receive a completion certificate.
- Insurance and warranty: If the builder is insured under NHBC Buildmark or similar, you receive a warranty document.
Stage 10: Handover and Enjoyment
You’ve done it. The extension is yours to enjoy.
What You Get
- Completion certificate (proof it meets Building Regulations)
- Warranty documentation (usually 10-year NHBC or equivalent)
- Manuals for appliances, boilers, etc.
- Keys, and your new, larger, better home
First Steps
- Register the completion certificate with your buildings insurer (they may offer a premium discount)
- If you plan to sell, keep all documentation safe—future buyers will want proof of compliance
- Enjoy the space; maintain it as you would the rest of your home
How Parker Grears Makes This Easy
We’ve guided 100+ homeowners through this journey. Here’s how we simplify it:
- Initial consultation (free): We visit, discuss your ideas, assess the site, and advise on what’s practical.
- Detailed quote and QS breakdown: Before you commit, you get a clear line-by-line cost estimate.
- Full project management: We liaise with architects, planners, regulators, and inspectors. You have one point of contact.
- Transparent communication: Regular updates, photo reports, and milestone meetings.
- Quality and compliance: Our team is SMSTS certified, all staff hold CSCS cards, and we’re FMB members and TrustMark registered.
- Fixed timeline and budget: Within reason, we stick to agreed schedules and costs (extras are flagged upfront).
Why Choose Parker Grears
- 25+ years combined experience in residential building
- 5-star Google reviews from 25+ recent clients
- Fully insured (£5M Public Liability)
- 100+ satisfied customers across Nuneaton, Hinckley, Coventry, and Warwickshire
- No hidden costs—everything quoted upfront
Start Your Extension Today
Ready to add space and value to your Nuneaton home? We’re here to guide you every step.
Call Parker Grears Developments on 07731015784 or visit www.parkergrears.com to book your free consultation.
We’ll discuss your vision, assess your property, and walk you through the process. No obligation, no pressure—just honest advice and a clear roadmap to your dream extension.
Parker Grears Developments Ltd, 47 Northumberland Avenue, Nuneaton, CV10 8ER. Phone: 07731015784. Website: www.parkergrears.com. FMB member, TrustMark registered, fully insured, SMSTS and CSCS certified.